
Last year the advent calendar I made for Anya was a huge hit. She loved opening those boxes so much and since about June of this year she has been regularly asking when she could have another advent calendar. Of course I was going to make her another one, just not in June! I think the advent calendar may have been her favourite part of Christmas which is just as much about the build-up as it is about the day.
This year I’ve made my diy advent calendar a bit earlier as I wanted to share it with you sooner and I hope you like it. I was drawn to origami as I chanced across some lovely matt origami paper in a deep green. So I thought why not make a forest of mini Christmas trees and that’s exactly what happened. But of course I needed to find a place for the gifts and what better place than under the trees?


DIY Advent Calendar
Materials:
Origami paper – you can choose any colour but I went for two shades of green
Mini paper cups – they’re called souffle or sauce cups
Gold spray
Mini number stickers (or you could hand write the numbers on)
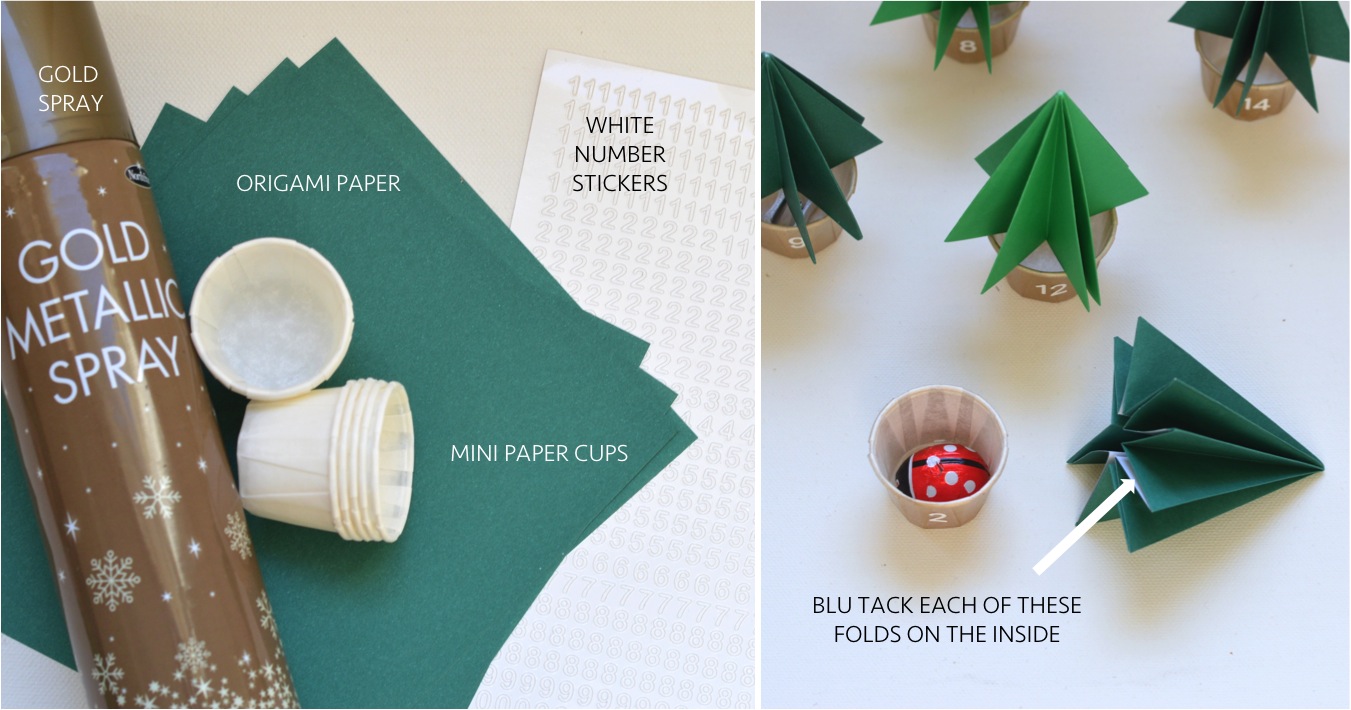
To start with make the trees. I followed an origami tree tutorial that I found online. It was a bit tricky at first but after the 2nd or 3rd tree it was really easy so stick with it. I didn’t even need to look at the instructions after the 5th or 6th tree. Follow the tutorial exactly but I added one more step. I blu-tacked each fold of all the trees as I found that they flared out too much otherwise, and didn’t stand up quite as well as I wanted them to.
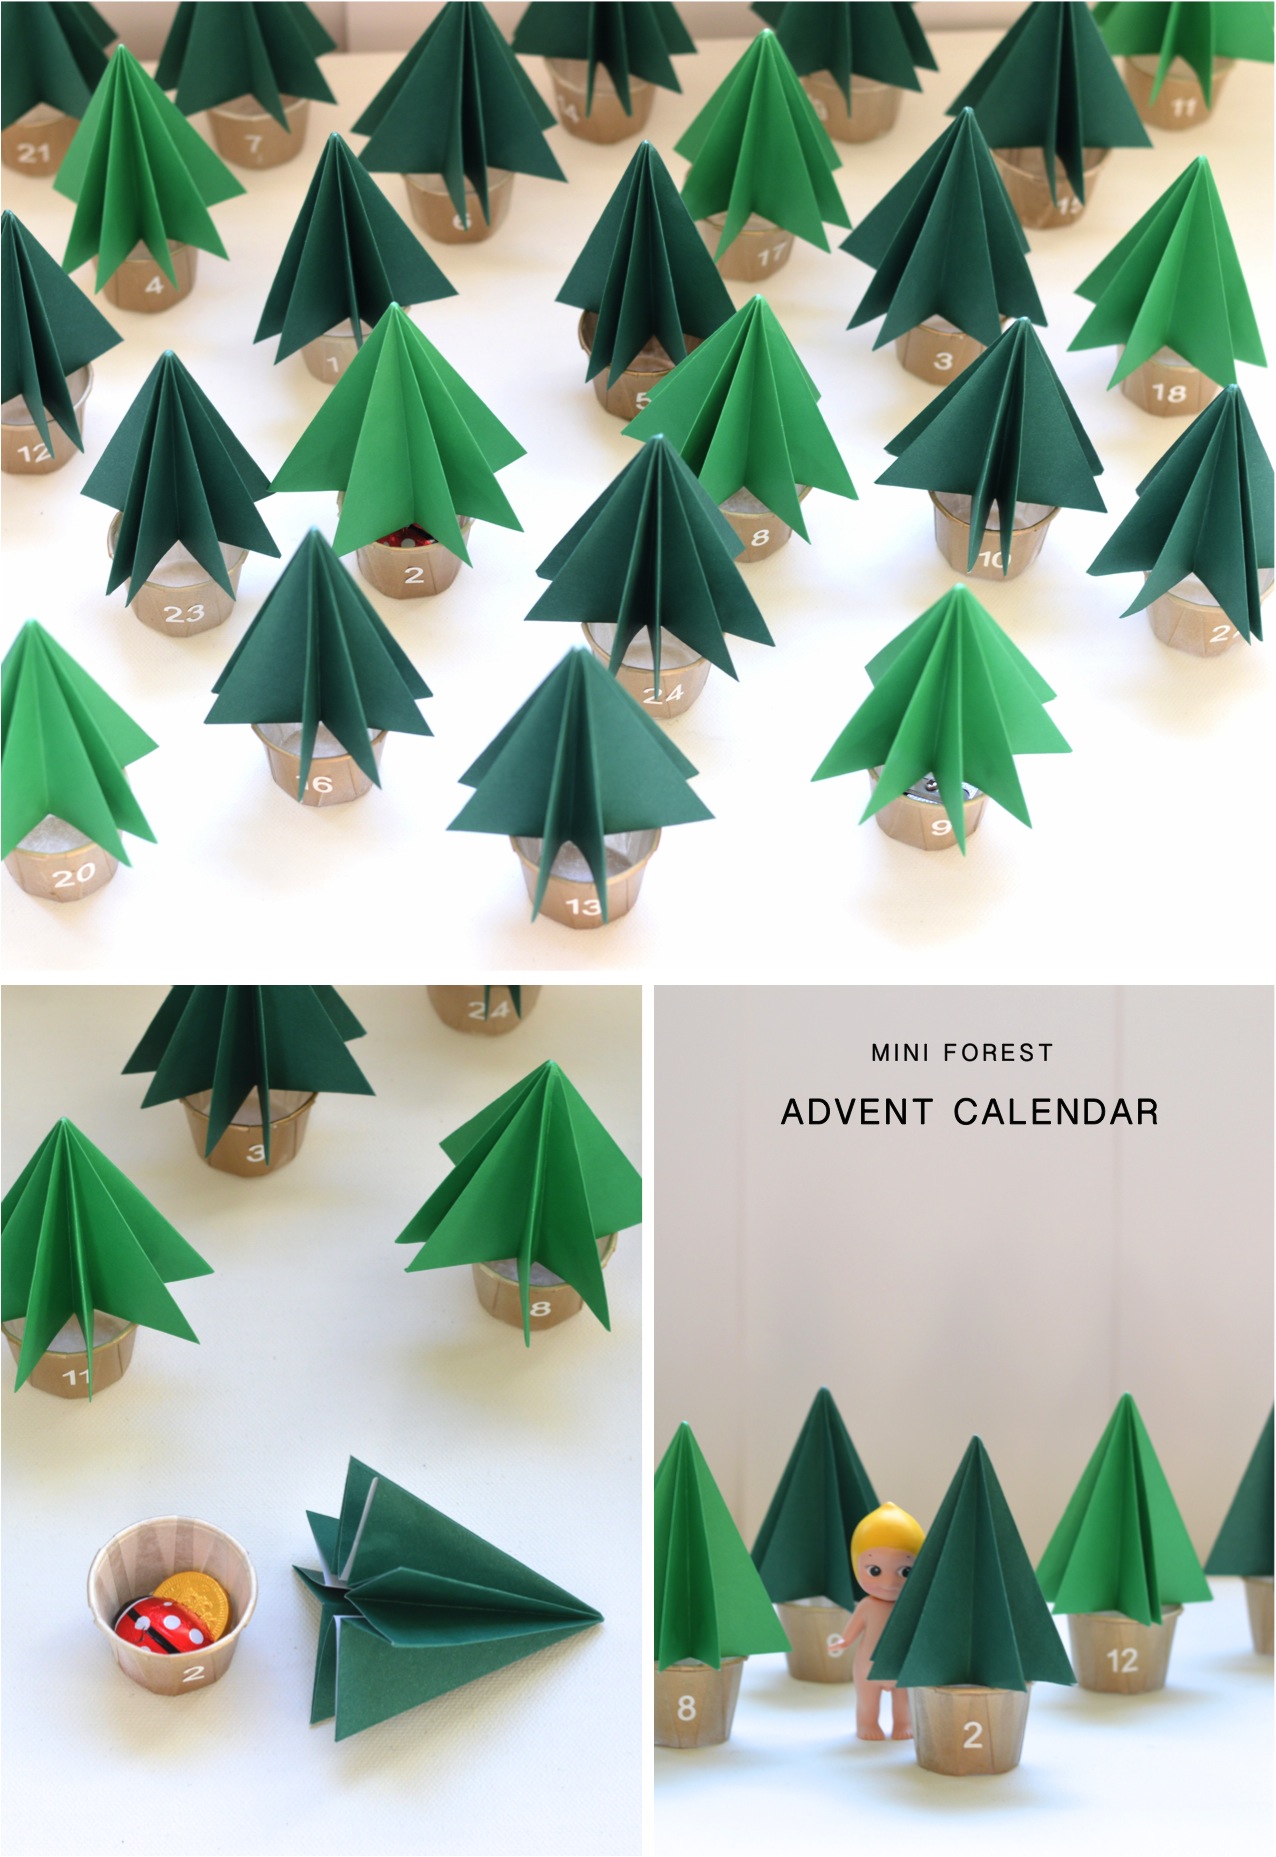
Next take your mini paper cups – these are the little paper cups that you fill with ketchup and mayo. They’re called soufflé cups and cost very little for loads of them. I had them at home as I’ve used them in the past for Anya’s birthday parties to serve ketchup. They make the perfect little pots to balance the trees on and of course to put your little gifts in. Spray them gold – best to put them in a disposable cardboard box or similar otherwise they fly around when you spray as they’re so light.

Finally take your number stickers (if using) and stick them on. Fill each pot with your little treat and place the tree on top. That’s it – done! You have an easy DIY advent calendar that looks so great. Do you usually make your own advent calendars or do you buy them?

This is so beautiful I can’t find the words, you are so talented Nomita, could this go in your shop, I’d buy one x
Thank you lovely – I enjoyed making it and Anya loves it! x
What a gorgeous calendar. All my little ones have pretty wooden or fabric advent calendars and every day in December, they discover a fun activity. They all love it (although my 6yo is starting to request chocolates instead!) and I have a board full of ideas on Pinterest. Pinning your beautiful calendar, hun. #BrillBlogPosts
Thanks for your lovely comment. I normally fill 3-4 boxes with a (very) small chocolate and the rest have little gifts like stickers, hair ties and other little bits that Anya likes. An activity is a lovely idea. Might add a few of those in this year. Thanks for pinning – checking out your board now.
these look absolutely gorgeous! What a fab idea xx
Thank you 🙂
ph my goodness! I’m pinning this and totally stealing it! Love it, so cute!! x xx
Thank you so much – love to see yours. Please share xx
Just wonderful! Thanks for linking up to #brilliantblogposts x
Thank you lovely xx
This is such an insanely adorable festive idea! Love this!
Thank you. So pleased it turned out as I had imagined. Now all I have to do it fill it 🙂
This looks amazing what a fab idea!
Loved coming back to this post via Marie Claire Maison! How exciting 😉 This is a fabulous concept so wonderfully produced, I wonder how you’re going to beat it next year 😉 x
Thanks for coming back. I never realised it would be so popular. I loved making it and won’t worry about next year just yet 🙂 x
What a brilliant and fun idea. I can’t wait to have a go at the origami tree tutorial!
Thanks so much. It’s easier than it looks especially after a few goes. I’m now wondering what else I can origami! 🙂
Hello! Love this idea – so cute! Are you willing to share what you included for the treats?
Yes of course! I mixed it up a lot. Because the containers are small I put in little notes in some – either an activity for my daughter or sometimes little clues as to where the gift would be hidden. In some I put in little gifts like a chocolate coin, hair ties, a balloon (not inflated of course 🙂 and just little things like that. Hope that answers.
thanks for the great idea, I love it and this year I have done it too. I posted few pictures and your link on my blog (and your 2015 Calendar is too cute !!)
I’m so glad you liked it. The little trees are so cute. I am looking forward to seeing yours and will take a look now.
Ohhh I love this idea!! Such a sweet craft activity for the kids and looks so cute
Thank you! It was fun to make too and has been a huge hit – more than I ever imagined 🙂