
Come autumn and I’ve got parties and gatherings in mind. With autumn (or fall) comes Diwali, Thanksgiving, Christmas – most of use celebrate at least one or more of these. That means lots of fun gatherings with friends and family.
When I have people over, the one thing I often run out of is coasters. So I figured, now was a good time to make some more, well ahead of time! I’ve made round coasters before so I wanted something different. I came up with this abstract squiggly design which turned out better than I’d hoped! The best part – these DIY squiggly coasters with clay cost next to nothing to and they’re so fun to make.
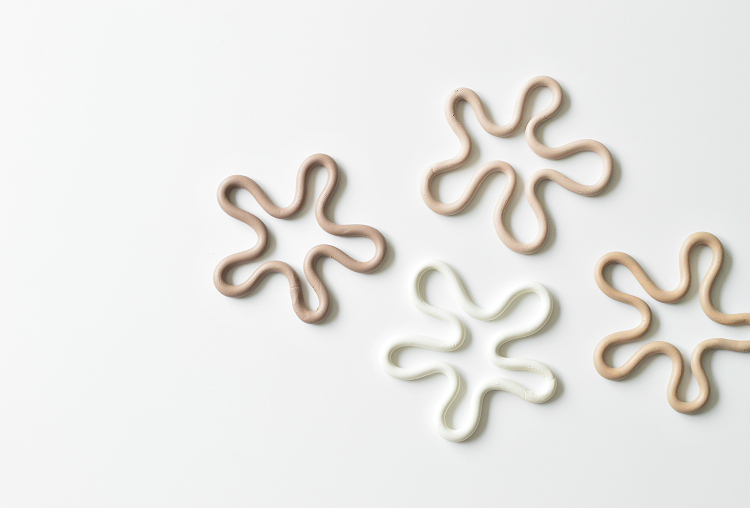
I love that each one is different. And each one of you making them will have a slightly different design. You can also switch up the colours but for me it has to be neutrals!

DIY squiggly coasters with clay
Materials:
57gms/2oz polymer clay (US readers here)
acrylic paint – my colours: ash brown, warm grey, white / US reader here: ash brown, warm grey, white)
After the video there’s are written tutorial if you prefer that.
Video on how to make these squiggly coasters with clay:
1. one pack of clay will make two coasters so break in half and roll in to a ball
2. roll the ball out in to a thin long, snake-like shape until you have a length of approx 53-55cms/21 inches
3. carefully join the ends of the clay by gently but firmly pressing the ends together to create a circle – the join should be firmly fixed otherwise it may break after baking
4. make the squiggly shape from the clay circle – play around with it until you’re happy with the shape
(there’s no right or wrong here but I suggest 5 squiggles only because when I tried 4, it didn’t look quite right to me!)
5. gently transfer the clay to a baking sheet – adjust the shape again if needed
6. bake according to instructions
7. allow to cool and paint your clay coasters – you’ll need 2-3 coats


The trickiest part of making these clay coasters is creating the shape. It takes a little patience – keep gently working and adjusting the clay and it will come together. Once you’ve made one, you can use it as a template for the others. Also remember to make sure the ends are properly joined. If not, they will break after baking – I speak from experience!
I made these DIY clay coasters to use at home. But I’m thinking they’d make cute handmade gifts too. When you’re invited to someones home, instead of taking a bottle of wine, wouldn’t these be nicer to gift?

[…] DIY coasters made with clay – these are one of my creations and I am pretty confident they will be loved by whoever you […]